屏幕后处理(二)
高斯模糊
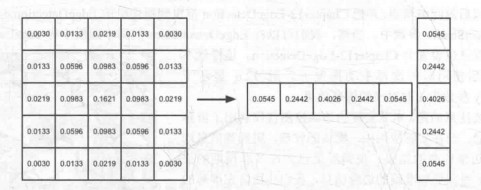
模糊算法是很多屏幕后处理效果的基础,如Bloom,景深,镜头渲染,其中效果比较好的是高斯模糊,高斯模糊是一种带权重的模糊算法,越中心权重越高。对于大小为K的卷积核,不进行优化的复杂度为K x K x M x N, 利用高斯模糊线性可分的特性,可以将过程优化为一次水平和一次垂直方向的模糊,让复杂度变为2 x K x M x N
此外,我们还可以通过降采样的方式来降低算法复杂度,以及调整模糊次数来调节模糊效果
相关代码如下:
//定义高斯模糊的两种采样
1 | v2f vertBlurVertical(a2v v) { |
Bloom
Bloom用于模拟现实生活中光源周围出现光晕的现象,在后处理中这一效果需要提取出屏幕较亮的区域,然后进行模糊,再与原图片进行叠加即可产生类似光晕的效果。Bloom应用于HDR图片的处理效果会更好,因为LDR无法区分白色的墙和白色光源,导致都会算成光源,而HDR则可进行区分。
C#部分代码:
    material.SetFloat("_LuminanceThreshold", luminaceThreshold);
    //将当前屏幕图片以HDR格式存储
    int rtID = Shader.PropertyToID("BloomSourceTex");
    cb.GetTemporaryRT(rtID, -1, -1, 0, FilterMode.Bilinear,RenderTextureFormat.DefaultHDR);
    cb.Blit(BuiltinRenderTextureType.CurrentActive, rtID);
    //降采样
    int rtW = ScreenWidth / downSample;
    int rtH = ScreenHeight / downSample;
    RenderTexture buffer0 = RenderTexture.GetTemporary(rtW, rtH, 0);
    buffer0.filterMode = FilterMode.Bilinear;
    cb.Blit(rtID, buffer0, material, 0);
    //多次模糊
    for (int i = 0; i < iterations; i++)
    {
        material.SetFloat("_BlurSize", 1.0f + blurSpread);
        RenderTexture buffer1 = RenderTexture.GetTemporary(rtW, rtH, 0);
        cb.Blit(buffer0, buffer1, material, 1);
        buffer0 = buffer1;
        buffer1 = RenderTexture.GetTemporary(rtW, rtH, 0);
        cb.Blit(buffer0, buffer1, material, 2);
        buffer0 = buffer1;
    }
    material.SetTexture("_Bloom", buffer0);
    cb.Blit(rtID, BuiltinRenderTextureType.CameraTarget, material, 3);
Shader部分代码:
//只取亮度大于阈值的像素
fixed4 fragExtractBright(v2f i) : SV_Target{
    fixed4 c = tex2D(_MainTex, i.uv);
    fixed val = clamp(luminance(c) - _LuminanceThreshold, 0.0, 1.0);
    return c * val;
}
//叠加
fixed4 fragBloom(v2fBloom i) : SV_Target{
    return tex2D(_MainTex, i.uv.xy) + tex2D(_Bloom, i.uv.zw);
}
...
//四个Pass第一个提取,第二、三个高斯模糊,第四个叠加
Pass {
    CGPROGRAM
    #pragma vertex vertExtractBright
    #pragma fragment fragExtractBright
    ENDCG
}
UsePass "Custom/GaussianBlur/GAUSSION_BLUR_VERTICAL"
UsePass "Custom/GaussianBlur/GAUSSION_BLUR_HORIZONTAL"
Pass{
    CGPROGRAM
    #pragma vertex vertBloom
    #pragma fragment fragBloom
    ENDCG
}
景深
景深是在聚焦处清晰,其他地方模糊的效果,主要原理是渲染一张模糊后的图形,然后根据深度图的深度信息,将最终图像进行不同程度的模糊,到达一种基于深度的聚焦效果,该部分在深度图这一节中已经实现过。
径向模糊
径向模糊是一种在图像中心清晰,越边缘越模糊的效果,常用于加速时的画面表现,主要原理是在中心点到像素点的方向上进行多次采样并取平均得到模糊效果,然后依据和中心点的距离进行原图和模糊图的插值,达到越边缘模糊程度越高的效果,代码如下:
fixed4 fragBlur(v2f i) : SV_Target{
    //计算辐射中心点位置
    fixed2 dir = 0.5 - i.uv;
    //计算取样像素点到中心点距离
    fixed dist = length(dir);
    dir /= dist;
    dir *= _Radial;
    fixed4 sum = tex2D(_MainTex, i.uv - dir * 0.01);
    sum += tex2D(_MainTex, i.uv - dir * 0.02);
    sum += tex2D(_MainTex, i.uv - dir * 0.03);
    sum += tex2D(_MainTex, i.uv - dir * 0.05);
    sum += tex2D(_MainTex, i.uv - dir * 0.08);
    sum += tex2D(_MainTex, i.uv + dir * 0.01);
    sum += tex2D(_MainTex, i.uv + dir * 0.02);
    sum += tex2D(_MainTex, i.uv + dir * 0.03);
    sum += tex2D(_MainTex, i.uv + dir * 0.05);
    sum += tex2D(_MainTex, i.uv + dir * 0.08);
    sum *= 0.1;
    return sum;
}

fixed4 fragAdd(v2f i) : SV_Target{
    fixed dist = length(0.5 - i.uv);
    fixed4  col = tex2D(_MainTex, i.uv);
    fixed4  blur = tex2D(_BlurTex, i.uv);
    col = lerp(col, blur, saturate(_Strength * dist));
    return col;
}
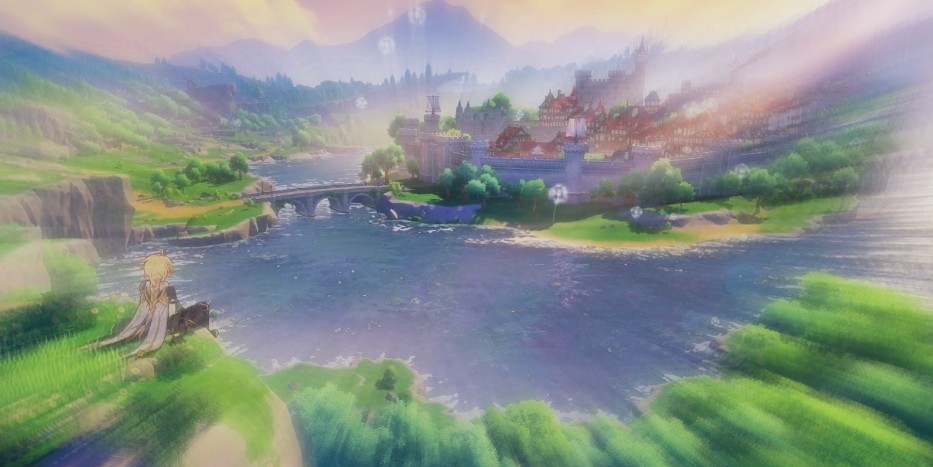
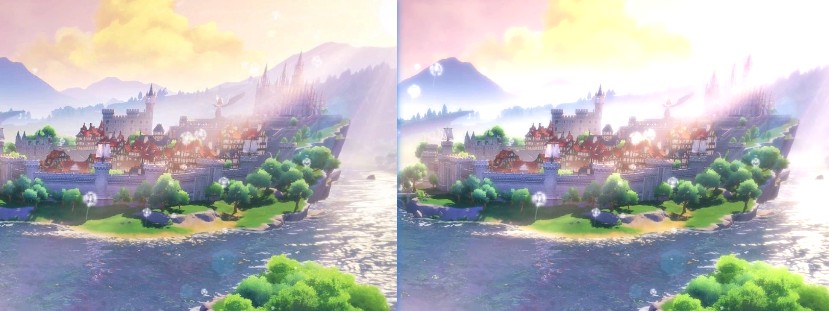
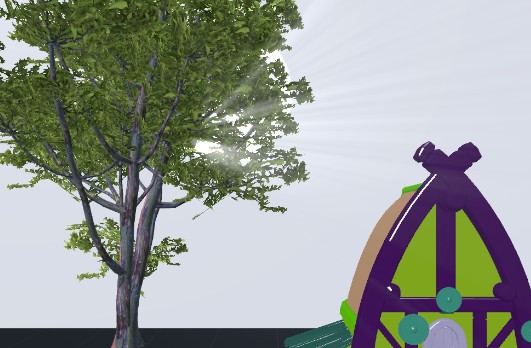
体积光
体积光又称为圣光,其实际表现如下

它的实现方式有许多种,在后处理中,它的实现主要是基于径向模糊,大致思路和Bloom比较像,在图像中提取高亮部分,然后进行依据光源位置进行径向模糊并叠加,代码如下:
int rtID = Shader.PropertyToID("SunShaftSourceTex");
material.SetFloat("_LuminanceThreshold", luminanceThreshold);
material.SetFloat("_Radial", radial);
material.SetFloat("_SampleNum", sampleNum);
material.SetFloat("_Bright", bright);
material.SetColor("_SunShaftColor", sunColor);
material.SetVector("_SunPos", Camera.main.WorldToViewportPoint(sun.transform.position));
cb.GetTemporaryRT(rtID, -1, -1, 0, FilterMode.Bilinear, RenderTextureFormat.DefaultHDR);
cb.Blit(BuiltinRenderTextureType.CurrentActive, rtID);
RenderTexture buffer0 = RenderTexture.GetTemporary(ScreenWidth, ScreenHeight, 0);
buffer0.filterMode = FilterMode.Bilinear;
//提取亮部
cb.Blit(rtID, buffer0, material, 0);
//多次径向模糊
for(int i = 0;i < sampleNum;i ++)
{
    RenderTexture buffer1 = RenderTexture.GetTemporary(ScreenWidth, ScreenHeight, 0);
    cb.Blit(buffer0, buffer1, material, 1);
    buffer0 = buffer1;
}
material.SetTexture("_BlurTex", buffer0);
//将当前图像和模糊结果叠加
cb.Blit(rtID, BuiltinRenderTextureType.CameraTarget, material, 2);
运动模糊
运动模糊是一种在物体或者相机高速运动时产生的一种拖尾效果,其中通过深度图的实现的方式,已经深度图这一节中写了,这种实现方式只适用于相机运动,物体不运动的情况,另外一种实现方式为将前几帧的图像与当前帧进行混合,关键代码如下
1 | // Shader部分 |
其中传入Shader的_BlurAmount数值越小,混合测试当前帧图像的比例越小,之前帧的比例越大,拖尾效果就越明显
该实现方法在Unity中,如果_BlurAmount数值较小的时候会出现残留的问题,原因未知,看到乐乐大佬的Unity入门精要提问区也有这个问题MotionBlur残留问题,但是没有明确答案
